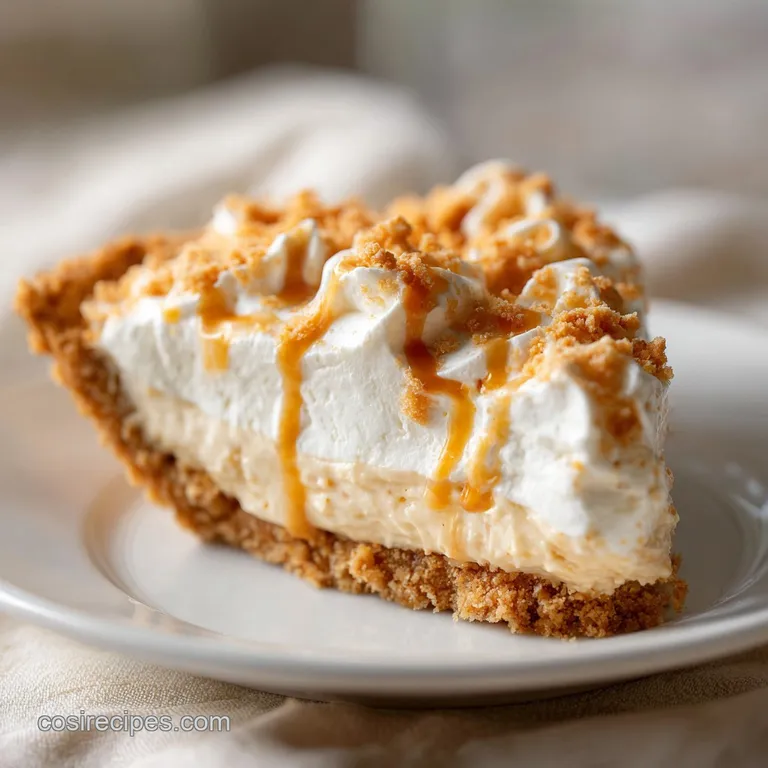
Amish Peanut Butter Cream Pie 2
- Time: Active 15 minutes, Passive 2 hours, Total 2 hours 15 minutes
- Flavor/Texture Hook: Silky custard meets salty, sandy peanut butter crumbles
- Perfect for: Potlucks, family gatherings, or a comforting weekend treat
- Why You Will Love This Pie
- Critical Recipe Specs and Comparisons
- Essential Ingredient Deep Dive
- Essential Tools for Perfect Results
- Step by Step Making Guide
- Fixing Common Amish Pie Mistakes
- Creative Twists and Easy Swaps
- Storing and Using Every Crumb
- Beautiful Plating for Every Occasion
- Recipe FAQs
- 📝 Recipe Card
Listen, if you have ever stepped into a quiet bakery in the middle of a Pennsylvania farm, you know that specific aroma. It is not just sugar; it is the scent of heavy cream, toasted nuts, and that slightly salty, buttery goodness that sticks to the roof of your mouth.
The first time I tried this specific Amish peanut butter cream pie 2, I was sitting on a wooden bench outside a roadside stand, and the way the cold, silky custard hit those gritty, sweet crumbles was a total revelation.
I used to think cream pies were all the same until I realized the Amish secret is in the layering. Most pies just mix everything together, but here, we are creating a textural playground. You get the crunch of the graham cracker crust, the "sand" of the peanut butter crumbles, and a vanilla cloud on top.
It is the kind of dessert that makes people go quiet after the first bite because they are busy trying to process how something so simple can taste so incredibly complex.
We are going to walk through exactly how to get that custard thick enough to slice but soft enough to melt. I have made the mistake of rushing the cooling process before, and trust me, nobody wants a "soup pie." But follow these steps, and you will have a dessert that looks like it came straight out of a professional bakery window.
It is pure, unadulterated comfort on a plate, and I cannot wait for you to see the look on your friends' faces when you pull this out of the fridge.
Why You Will Love This Pie
This dish is a masterclass in contrasting textures. While many modern desserts rely on heavy fats and artificial stabilizers, this recipe uses old school techniques like tempering egg yolks to create a natural, rich mouthfeel. It is essentially three desserts in one: a cookie like base, a gourmet pudding, and a whipped topping. If you find yourself enjoying the heartiness of an Amish Sunday Savior recipe, you will appreciate the honest, soul filling nature of this traditional dessert.
The Physics of the Crumble: Rubbing peanut butter into powdered sugar coats the sugar crystals in fat, creating tiny "sand" pebbles. These pebbles resist dissolving into the custard, ensuring a distinct, gritty crunch in every single bite.
- Mechanical Stability: The cornstarch acts as a scaffolding for the milk proteins, preventing the custard from weeping.
- Fat Suspension: Egg yolks provide lecithin, which emulsifies the fats from the milk and peanut butter into a unified, velvety texture.
- Thermal Protection: Using cold milk to start the custard prevents the egg yolks from curdling when they eventually meet the heat.
- Aromatic Carry: The high fat content in the heavy cream helps the vanilla extract permeate every layer of the dish.
| Method | Prep Time | Texture Profile | Best For |
|---|---|---|---|
| Traditional Amish | 20 minutes | Dense, silky custard | Authentic Sunday dinner |
| The Fast Track | 10 minutes | Light, mousse like | Quick weeknight cravings |
| Deep Chill | 15 minutes | Firm, ice cream adjacent | Hot summer afternoons |
The traditional method is what we are focusing on today because it provides that iconic "sliceable" density that defines a true Amish cream pie. While the fast track might save a few minutes, you lose that beautiful separation between the crumbles and the custard that makes this dish so special.
Critical Recipe Specs and Comparisons
Precision is your best friend when working with egg based custards. If you cook it too long, it becomes rubbery; too short, and it is a puddle. You are looking for a specific "nappe" consistency, where the custard is thick enough to coat the back of a spoon and hold a line when you run your finger through it. This is similar to the precision needed for a Fluffy Japanese Pancakes recipe, where the structural integrity depends entirely on the timing of your heat.
Chef Note: Always use whole milk. low-fat or skim milk lacks the fat solids needed to bind with the cornstarch properly, which often results in a thin, watery filling that will soak into your crust and make it soggy.
| Ingredient | Science Role | Pro Secret |
|---|---|---|
| Egg Yolks | Emulsifier | Use room temp yolks for a smoother temper. |
| Cornstarch | Thickening agent | Whisk with sugar first to prevent lumps. |
| Peanut Butter | Flavor & Fat | Creamy works better than crunchy for the "sand." |
| Powdered Sugar | Crumble Base | Sift it to ensure the crumbles stay light. |
The interaction between the powdered sugar and the peanut butter is the most fascinating part of this recipe. Because powdered sugar contains a tiny bit of cornstarch, it helps the peanut butter crumbles stay distinct rather than melting into a greasy mess.
When you rub them together, you are essentially creating a shelf stable fat sugar hybrid that provides the signature "Amish" mouthfeel.
Essential Ingredient Deep Dive
Before we start mixing, let's talk about the components. You need 1/2 cup (130g) of creamy peanut butter and 1 cup (125g) of powdered sugar for those iconic crumbles. For the custard itself, you will use 2 cups (480ml) of whole milk, 3 large egg yolks, 1/2 cup (100g) of granulated sugar, and 3 tbsp of cornstarch.
Do not forget the 1/4 tsp of salt it is the only thing standing between "delicious" and "cloyingly sweet."
| Original Ingredient | Substitute | Why It Works |
|---|---|---|
| Whole Milk | Coconut Milk (full fat) | High fat content maintains creaminess with a nutty hint. |
| Powdered Sugar | Granulated (pulsed) | Blending sugar with a pinch of starch mimics the texture. |
| Graham Crust | Digestive Biscuit | Similar crumbly texture but slightly less sweet. |
For the topping, you will need 1 cup (240ml) of heavy whipping cream and 2 tbsp of powdered sugar. I highly recommend using a high-quality pure vanilla extract (1 tsp) rather than the imitation stuff. The fat in the custard will amplify the vanilla notes, so the better the quality, the better the final result. If you are looking for a savory contrast to serve later, you might try a Homemade Tartar Sauce Recipe for a seafood dinner, but for now, we are staying firmly in the world of sweets.
Essential Tools for Perfect Results
You don't need a professional kitchen, but a few specific tools make this process much easier. A heavy bottomed saucepan is non negotiable. Thin pans create hot spots that will scorch your milk and eggs before the cornstarch has a chance to activate.
You will also want a balloon whisk for the custard and a pastry cutter (or just your fingers) for the crumbles.
- Heavy Saucepan: Prevents bottom scorching.
- Fine Mesh Sieve: Use this if you accidentally curdle the eggs slightly it saves the custard.
- Electric Hand Mixer: Essential for getting those stiff peaks in the heavy cream.
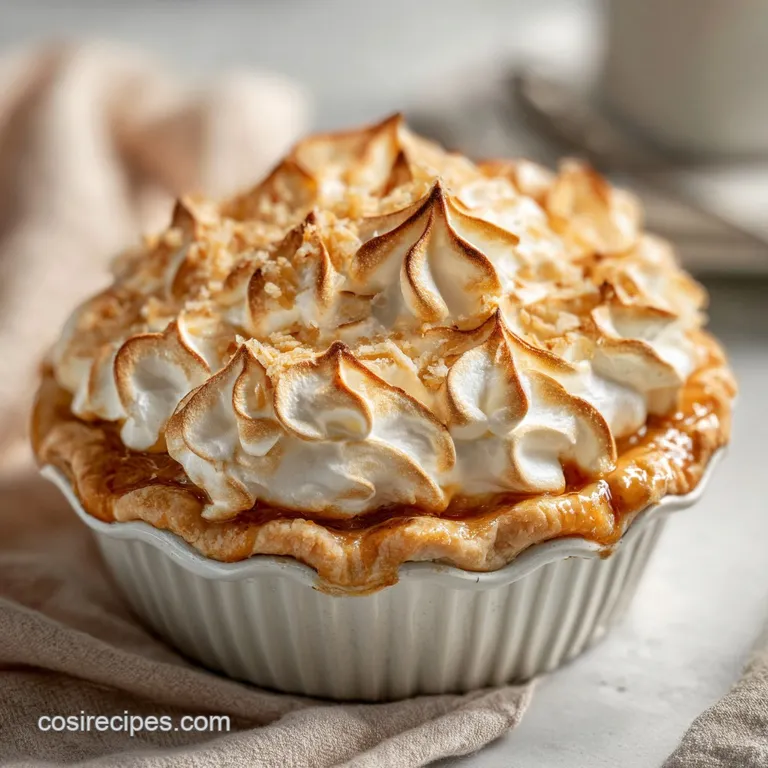
- Glass Pie Plate: 9 inch size is standard; glass helps you see if the crust is holding up.
If you don't have a pastry cutter, don't sweat it. I actually prefer using my fingers to make the peanut butter crumbles. It allows you to feel the texture you want it to feel like damp sand. If the crumbles are too big, they will be heavy; if they are too small, they will disappear into the custard.
Aim for the size of small peas.
step-by-step Making Guide
Mixing the Signature Crumbles
Combine 1 cup (125g) powdered sugar and 1/2 cup (130g) creamy peanut butter in a medium bowl. Use a fork or your fingers to rub the peanut butter into the sugar until it resembles coarse crumbs. Note: Set aside about 1/4 cup of these crumbs to sprinkle on the very top of the pie later.
Constructing the Base Layer
Take your pre baked 9 inch graham cracker crust and pour about 2/3 of the peanut butter crumbles into the bottom. Spread them out evenly, pressing down very lightly so they form a stable but loose layer. Prepare for the custard to lock these in place.
Whisking the Velvet Custard
In a medium saucepan, whisk together 1/2 cup (100g) granulated sugar, 3 tbsp cornstarch, and 1/4 tsp salt. Gradually whisk in 2 cups (480ml) whole milk until the mixture is completely smooth and no lumps remain.
Tempering for a Silky Finish
Place the saucepan over medium heat and stir constantly. In a small separate bowl, lightly beat 3 large egg yolks. Once the milk mixture is warm but not boiling, slowly whisk about half a cup of the warm milk into the egg yolks.
Note: This prevents the eggs from scrambling when they hit the hot pan.
Achieving the Thickened Texture
Pour the egg mixture back into the saucepan. Continue cooking over medium heat, stirring constantly with a whisk. Cook until the mixture thickens and just begins to bubble, which usually takes about 5 minutes.
Finalizing the Filling
Remove the pan from the heat and stir in 1 tsp pure vanilla extract. Let the custard sit for about 2 minutes to cool slightly before pouring. This prevents the heat from melting the bottom crumbles too quickly.
Layering for Maximum Impact
Pour the warm custard carefully over the peanut butter crumbles in the pie crust. Use a spatula to smooth the top into an even layer. The custard should look glossy and thick.
The Critical Cooling Phase
Press a piece of plastic wrap directly onto the surface of the custard. Note: This prevents a "skin" from forming on the pudding. Refrigerate for at least 2 hours, or until the custard is completely set and cold to the touch.
Whipping the Cloud Topping
In a cold bowl, beat 1 cup (240ml) heavy whipping cream and 2 tbsp powdered sugar until stiff peaks form. The cream should be airy but hold its shape when the whisk is lifted.
Finishing the Presentation
Spread the whipped cream over the chilled custard. Sprinkle the reserved 1/4 cup of peanut butter crumbles over the top. Serve immediately or keep chilled until ready to eat.
Fixing Common Amish Pie Mistakes
The biggest heartbreak with this pie is a runny filling. If you cut into your pie and the custard flows out like lava, it usually means the cornstarch wasn't "activated." Cornstarch needs to reach a gentle boil to actually lock the molecules together.
If you stop the moment it gets slightly thick, it won't have the structural strength to hold up once it is sliced.
Preventing a Soggy Bottom
If your graham cracker crust is getting soft, it is usually because the custard was poured in while it was still piping hot. Let the custard rest for a few minutes on the counter, stirring occasionally, before layering it over the crumbles.
The crumbles actually act as a moisture barrier, but they can only do so much if the liquid is boiling.
| Problem | Root Cause | Solution |
|---|---|---|
| Lumpy Custard | Eggs added too fast | Use a sieve to strain out cooked egg bits. |
| Oily Crumbles | Too much PB | Add 1 tbsp more powdered sugar and toss. |
| Runny Filling | Under cooked starch | Ensure the mixture reaches a simmer for 1 min. |
Another common issue is "weeping," where a thin layer of water forms between the custard and the whipped cream. This is usually caused by the custard being slightly too warm when the whipped cream is applied. Always make sure the pie is cold all the way through before you add that final layer of cream.
Common Mistakes Checklist: ✓ Whisk the cornstarch into the dry sugar first to prevent "starch balls." ✓ Temper the yolks slowly adding hot liquid too fast creates scrambled eggs. ✓ Don't skip the plastic wrap on the surface while cooling.
✓ Use cold heavy cream and a cold bowl for the best whipped volume. ✓ Avoid natural peanut butter that separates; the added oils can break the custard.
Creative Twists and Easy Swaps
While the traditional version is a classic for a reason, you can easily adapt this recipe to your own taste. Some people love an Amish peanut butter pie with chocolate layer. To do this, simply melt 1/2 cup of chocolate chips and spread them over the crust before adding the crumbles.
Once it hardens, continue with the recipe as usual.
If you want an Amish peanut butter cream pie no bake experience, you can use a pre made crust and focus entirely on the stovetop custard. For a "salted caramel" vibe, swap the granulated sugar for brown sugar in the custard.
It adds a deep, molasses like undertone that pairs beautifully with the salty peanut butter.
- If you want a Crunchier Texture: Add 1/4 cup of chopped roasted peanuts to the crumble mixture.
- If you want a Lighter Pie: Fold half of the whipped cream into the cooled custard before pouring it into the crust.
- If you want it Extra Easy: Use a high-quality instant vanilla pudding, but replace half the milk with heavy cream for better stability.
Storing and Using Every Crumb
This pie is best eaten within 24 to 48 hours. Because it contains fresh dairy and egg yolks, it must be kept refrigerated at all times. If you have leftovers, cover the pie loosely with foil or a pie dome.
Do not use plastic wrap once the whipped cream is on, as it will flatten the peaks and make the topping look messy.
- Fridge: Up to 3 days. The crust will start to soften after day 2.
- Freezer: You can freeze this pie, but the texture of the custard will change slightly upon thawing. It becomes a bit more porous.
- Zero Waste Tip: If you have leftover peanut butter crumbles, don't throw them away! They are incredible as a topping for morning oatmeal or swirled into a batch of brownie batter.
When reheating is not an option for a cold cream pie, you can "revive" a day old slice by adding a fresh dollop of whipped cream and a tiny pinch of sea salt. The salt will wake up the peanut butter flavors that might have dulled in the cold fridge.
Beautiful Plating for Every Occasion
Presentation is where you can really make this Amish peanut butter cream pie 2 shine. Depending on where you are serving it, you might want to change up the "vibe" of the dish.
The Simple Home Slice
Place a generous wedge on a plain white plate. Don't worry about being too neat; the charm of an Amish pie is its rustic, homemade look. A simple fork on the side is all you need.
The Polished Sunday Dinner
Use a piping bag with a large star tip to create uniform mounds of whipped cream around the border of the pie. Sprinkle the reserved crumbles only in the center for a clean, professional look.
The Restaurant Style Masterpiece
Drizzle a thin line of melted dark chocolate in a zig zag pattern across the entire pie. Garnish each individual slice with a whole peanut and a tiny sprig of mint. Serve on a dark plate to make the white cream pop.
| Tweak | Effect |
|---|---|
| Piped Border | Adds height and elegance |
| Cocoa Dusting | Cuts through the sweetness |
| Warm Plate | Avoid this! Always serve on chilled plates. |
Regardless of how you plate it, the magic is in the layers. When you cut the slice, make sure to use a sharp, thin knife dipped in warm water and wiped dry between every cut. This ensures that the custard layers stay distinct and don't smear, giving everyone that gorgeous view of the peanut butter "sand" hiding at the bottom.
Enjoy every bite!

Recipe FAQs
Is it true that the peanut butter crumbles should dissolve completely into the custard?
No, that is the common misconception. The goal is a distinct, gritty crunch provided by the fat-coated sugar crystals resisting the moisture.
How to prevent the custard filling from becoming runny or watery?
Ensure the cornstarch mixture reaches a gentle boil for one full minute. This activation period is critical for the starch to build the necessary structure to hold the pie filling firm once chilled.
Can I substitute low-fat milk for whole milk in the custard?
No, stick with whole milk. low-fat or skim milk lacks the necessary fat solids to properly emulsify with the cornstarch and egg yolks, which results in a thin filling.
What is the key technique for achieving a perfectly smooth, non-scrambled custard?
Temper the egg yolks slowly by gradually whisking in hot liquid. This process gently raises the yolk temperature before they hit the main hot mixture, which prevents them from cooking too quickly and curdling.
How long should the finished pie chill before slicing?
Refrigerate for a minimum of two hours until fully set. For the best, clean slice, aim for four hours, ensuring the custard structure is completely stable before cutting.
How to ensure the whipped cream topping doesn't deflate or weep?
Apply the cream only after the custard is completely cold. If you enjoyed controlling the structural integrity here, apply the same temperature discipline when making a Brioche French Toast recipe for perfect results.
Can I use crunchy peanut butter instead of creamy for the crumble layer?
You can, but creamy is recommended for the authentic texture. Crunchy butter introduces large particulate matter that can make the bottom layer feel too heavy rather than sandy.
Amish Peanut Butter Cream Pie 2
Ingredients:
Instructions:
Nutrition Facts:
| Calories | 487 kcal |
|---|---|
| Protein | 9.0 g |
| Fat | 27.7 g |
| Carbs | 53.5 g |
| Fiber | 1.8 g |
| Sugar | 32.9 g |
| Sodium | 247 mg |
