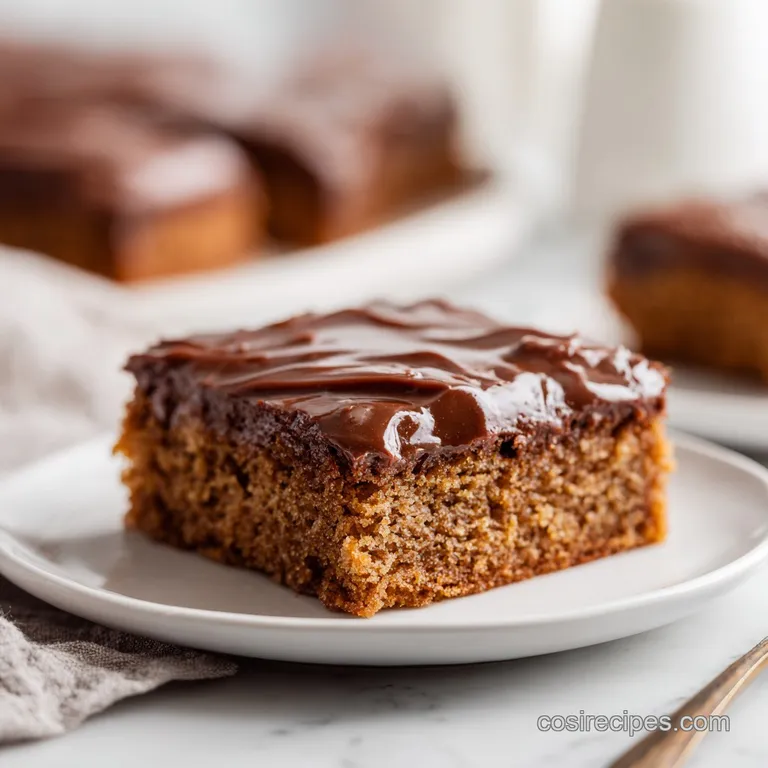
Texas Sheet Cake: Rich and Moist

- Time: Active 10 minutes, Passive 20 minutes, Total 30 minutes
- Flavor/Texture Hook: Deeply chocolatey with a velvety, melt in-your mouth finish
- Perfect for: Family reunions, neighborhood potlucks, or large birthday celebrations
- Why This Works
- Critical Numbers for the Perfect Fudgy Chocolate Bake
- Selecting the Best Components for a Decadent Crumb
- The Essential Tools for Baking Massive Sheet Cakes
- Step by Step Guide to a Flawless Finish
- Fixing Common Mistakes for a Velvety Cake Texture
- Adapting Your Bake for Any Crowd or Occasion
- Busted Myths About the Sheet Cake Process
- Keeping Your Chocolate Masterpiece Fresh and Moist
- The Best Complements for Rich Chocolate Flavors
- Recipe FAQs
- 📝 Recipe Card
Nothing is worse than cutting into a chocolate cake and finding a dry, crumbly mess that sticks to the roof of your mouth. I used to think all sheet cakes were destined to be a bit "bready" and uninspired, the kind of dessert you only eat because it is there.
That changed the first time I saw the batter for a real texas sheet cake recipe coming together on the stove. It wasn't a thick, aerated dough; it was a liquid, glossy river of chocolate that looked more like soup than cake.
The real magic happens because we aren't just mixing ingredients; we are performing a little kitchen alchemy. If you have ever struggled with cakes that feel heavy or frostings that refuse to spread evenly, this is the fix you have been looking for.
By boiling the butter and water with the cocoa, we unlock a depth of flavor that a simple stir and bake method just can't touch. We are going for a texture that is closer to a brownie but with the light, airy lift of a traditional sponge.
We have all been there, standing over a cake that is either too sweet or too bland. This recipe balances that sweetness with a hit of salt and the acidic tang of buttermilk, ensuring every bite feels elegant and balanced. You are about to become the person everyone asks to bring dessert to the party.
Let's get into what makes this specific method so much better than the standard box mix or traditional layer cake.
Why This Works
- Liquid Infusion: Boiling the water and butter together ensures the fat is perfectly distributed throughout the flour, preventing any dry pockets from forming in the crumb.
- Cocoa Blooming: The heat from the boiling water "blooms" the cocoa powder, which means it releases the trapped flavor oils for a more intense chocolate experience.
- Chemical Lift: The acidity in the buttermilk reacts instantly with the baking soda, creating tiny carbon dioxide bubbles that keep the thin cake from becoming a leaden brick.
- Hot Glaze Saturation: Pouring the frosting over the cake while it is still piping hot allows the glaze to seep into the top millimeter of the cake, creating a seamless transition between sponge and sugar.
| Pan Style | Cake Thickness | Bake Time | Visual Cue |
|---|---|---|---|
| Jelly Roll (18x13) | 1.25 cm | 18-20 mins | Edges pull away slightly |
| Standard (9x13) | 2.5 cm | 25-28 mins | Toothpick comes out clean |
| Half Sheet (13x9) | 1.9 cm | 22-24 mins | Center springs back to touch |
Choosing the right pan is the first step in mastering the texture. If you want those classic, thin squares that shatter slightly at the edges, go for the larger jelly roll pan. If you prefer a more traditional cake height that feels like a thick brownie, the 9x13 is your best friend.
Just remember that the thicker the cake, the longer it needs in the heat to set that center.
Critical Numbers for the Perfect Fudgy Chocolate Bake
| Component | Scientific Role | Pro Secret |
|---|---|---|
| Buttermilk | Protein Tenderizer | Never skip this; the acid is what makes the chocolate pop and the crumb soft. |
| Boiling Water | Starch Gelatinization | Using boiling liquid partially "cooks" the flour starch, leading to a moister result. |
| Unsweetened Cocoa | Structural Flavor | Use a high-quality Dutch process for a darker, more velvety color. |
| Baking Soda | Leavening Agent | Soda needs an acid (buttermilk) to work; without it, your cake will be flat and metallic. |
The relationship between the buttermilk and the baking soda is what prevents this cake from being a dense disc. When that acid hits the soda, the reaction is immediate. This is why we add the buttermilk near the end of the mixing process.
We want those bubbles to be active as the cake hits the oven, not lost while we are still whisking.
If you find yourself running low on buttermilk, you can always make a quick version by adding a splash of lemon juice to regular milk. However, for the most elegant crumb, the real deal is always better. For another masterclass in texture, you might want to look at how moisture is managed in an Authentic French Brioche, where the fat content is handled with similar precision to ensure a silky result.
Selecting the Best Components for a Decadent Crumb
- 2 cups All purpose Flour (250g): Provides the structure. Why this? It has the right protein balance for a tender but sturdy cake.
- Substitute: 1:1 gluten-free baking blend for a similar texture.
- 2 cups Granulated Sugar (400g): Sweetens and tenderizes. Why this? Sugar attracts moisture, keeping the sheet cake soft for days.
- Substitute: Light brown sugar for a more molasses forward flavor.
- 0.5 teaspoon Salt (3g): Sharpens the chocolate. Why this? Salt is the primary flavor enhancer for cocoa.
- Substitute: Sea salt flakes for a more textured finish.
- 1 teaspoon Baking Soda (6g): The lift provider. Why this? It reacts with the buttermilk for an airy crumb.
- Substitute: 3 teaspoons baking powder (but the flavor will change slightly).
- 1 cup Unsalted Butter (227g): For the cake base. Why this? Butter provides a richness that oil cannot match.
- Substitute: high-quality margarine if dairy-free is required.
- 4 tablespoons Unsweetened Cocoa Powder (20g): For the cake. Why this? Provides the base chocolate note.
- Substitute: Cacao powder for a more raw, bitter edge.
- 1 cup Boiling Water (235ml): To bloom the cocoa. Why this? High heat extracts the most chocolate flavor quickly.
- Substitute: Hot brewed coffee to deepen the chocolate profile.
- 0.5 cup Buttermilk (120ml): For tenderness. Why this? The acidity breaks down gluten for a softer bite.
- Substitute: 0.5 cup whole milk with 1/2 tablespoon white vinegar.
- 2 large Eggs: The binder. Why this? Eggs provide stability and emulsify the fats.
- Substitute: 0.5 cup unsweetened applesauce for a denser cake.
- 1 teaspoon Vanilla Extract (5ml): Flavor booster. Why this? Vanilla rounds out the sharp edges of the cocoa.
- Substitute: Almond extract for a cherry like undertone.
- 0.5 cup Unsalted Butter (113g): For the glaze. Why this? Creates a glossy, set finish.
- Substitute: Salted butter (just omit the extra pinch of salt).
- 4 tablespoons Unsweetened Cocoa Powder (20g): For the glaze. Why this? Matches the cake's intensity.
- 6 tablespoons Whole Milk (90ml): Glaze liquid. Why this? Provides enough liquid to make the frosting pourable.
- Substitute: Heavy cream for a much richer, ganache like glaze.
- 3 cups Powdered Sugar (360g): The glaze base. Why this? Dissolves instantly for a smooth texture.
- Substitute: Sifted coconut sugar (note: texture will be grainier).
- 1 teaspoon Vanilla Extract (5ml): For the glaze.
- 1 cup Finely Chopped Pecans (110g): The classic crunch. Why this? Adds essential texture and a nutty fat to balance the sugar.
- Substitute: Toasted walnuts or omit entirely for nut allergies.
The Essential Tools for Baking Massive Sheet Cakes
You don't need a kitchen full of high tech gadgets to pull off this texas sheet cake recipe, but a few specific items make the job much smoother. First and foremost, you need a solid jelly roll pan.
This isn't just a cookie sheet; it has raised edges (usually about 1 inch deep) that hold the batter in place. If you use a flat cookie sheet, you will have a chocolate waterfall in the bottom of your oven, and nobody wants that cleanup.
A medium sized saucepan is also non negotiable. Because we are boiling the butter, water, and cocoa, you want something with enough room so it doesn't boil over when it starts to foam. I prefer a stainless steel pan so I can see the color of the mixture clearly.
A sturdy whisk is your best friend here, as you will be integrating the hot liquid into the dry flour mixture. You want to be able to knock out any lumps quickly before the heat from the water starts to set the flour.
Finally, have a heat resistant spatula ready. When you pour that glaze over the hot cake, you need to work quickly to push it to the corners before it starts to set. The glaze is effectively a quick cook fudge, and once it cools, it stops moving.
A large offset spatula is the pro choice here, but a regular rubber spatula will do the trick if you are quick on your feet.
step-by-step Guide to a Flawless Finish
- Preheat your oven to 350°F (175°C). Grease and flour an 18x13-inch jelly roll pan or a 9x13-inch baking pan. Note: This prevents the delicate thin cake from sticking to the bottom.
- In a large mixing bowl, whisk together the flour, granulated sugar, salt, and baking soda until well combined. Ensure there are no large clumps of soda.
- In a medium saucepan over medium high heat, combine 1 cup of butter, 4 tablespoons of cocoa powder, and 1 cup of water. Bring the mixture to a rolling boil until the surface is covered in dark, glossy bubbles.
- Pour the boiling chocolate mixture over the dry ingredients and whisk until the batter is smooth. Note: The heat will immediately begin to dissolve the sugar.
- Whisk in the buttermilk, eggs, and 1 teaspoon of vanilla extract until fully incorporated. The batter will be quite thin and runny.
- Pour the batter into the prepared pan and bake for 20 minutes, until a toothpick inserted in the center comes out clean and the cake feels springy.
- While the cake is baking, prepare the glaze: In a saucepan, combine 0.5 cup butter, 4 tablespoons cocoa powder, and 6 tablespoons whole milk. Bring to a boil, then remove from heat.
- Whisk in the sifted powdered sugar, 1 teaspoon of vanilla, and chopped pecans until smooth. Work quickly to ensure the sugar dissolves while the liquid is hot.
- Pour the warm glaze over the hot cake immediately after removing it from the oven, spreading it to the edges until the entire surface is covered in a reflective, chocolatey sheen.
Fixing Common Mistakes for a Velvety Cake Texture
One of the biggest hurdles with this recipe is the frosting. If you don't sift your powdered sugar, you might end up with tiny white dots in your dark chocolate glaze. It doesn't ruin the taste, but it definitely ruins the "masterpiece" look we are going for. Another issue is the "bubble" effect.
If you whisk your eggs too vigorously, you might incorporate too much air, which leads to a cake that domes in the middle and then collapses. We want a flat, even surface for that glaze to sit on.
Why Your Frosting Is Grainy
If the frosting feels gritty on your tongue, it usually means the butter and milk weren't hot enough when you added the sugar, or you used a low quality powdered sugar that contains too much cornstarch. The sugar needs to partially melt into the hot liquid to create that fudge like consistency.
If it has already cooled down, put it back on a very low flame for thirty seconds while whisking constantly.
Why the Cake Is Cracking
Cracks usually happen because of overbaking. Because this cake is so thin, it can go from perfect to parched in just two minutes. Start checking your cake at the 18 minute mark. If the edges are pulling away from the pan, it is done. The carryover heat will finish the center while the cake sits on the counter.
| Problem | Root Cause | Solution |
|---|---|---|
| Frosting is too thin | Not enough powdered sugar or too much milk | Add sugar 1/4 cup at a time until it coats a spoon |
| Cake is gummy | Underbaked or buttermilk was too cold | Ensure oven is preheated; bake until center springs back |
| Glaze won't spread | Cake cooled down too much | Always pour the glaze while the cake is piping hot from the oven |
Common Mistakes Checklist
- ✓ Sift your powdered sugar before adding it to the saucepan to avoid lumps.
- ✓ Pour the glaze the second the cake comes out of the oven for maximum absorption.
- ✓ Don't over mix the batter once the flour is added to keep it from getting tough.
- ✓ Use a heavy bottomed saucepan for the boil to prevent the cocoa from scorching.
- ✓ Ensure your baking soda is fresh by testing a pinch in a little vinegar first.
Adapting Your Bake for Any Crowd or Occasion
If you are cooking for a smaller household, you can easily cut this recipe in half. Use a 9x9 inch square pan and reduce the bake time by about 5 minutes. When halving the eggs, just crack one into a bowl, whisk it up, and use about half of the liquid.
It's a bit of extra work, but it keeps the ratios perfect so your cake doesn't end up too "eggy" or rubbery.
When scaling up for a massive event, like a wedding or a large church social, you can double the recipe and use two jelly roll pans. However, I recommend making the glaze in two separate batches.
If you try to make a double batch of glaze, it can cool down and set in the pan before you finish spreading it over the second cake. Keeping things in smaller batches ensures that "hot pour" magic remains intact.
For those who want to experiment with flavor, replacing the water with hot coffee is a classic move. The coffee doesn't make the cake taste like a latte; instead, it acts as a background singer that makes the chocolate taste more like "itself." It deepens the earthiness of the cocoa. If you are looking for a side dish to balance out all this chocolate at a big dinner, the creamy texture of a Cream Cheese Corn Casserole provides a wonderful salty sweet contrast to the meal.
| Feature | Standard Method | Fast Version |
|---|---|---|
| Prep Time | 10 Minutes | 5 Minutes (using microwave) |
| Texture | Velvety and soft | Slightly denser |
| Glaze Finish | Mirror like gloss | Matte finish |
If you want a truly refined look, you can follow the "three color garnish" strategy. Add a sprinkle of white sea salt flakes once the glaze has set for 5 minutes. This adds a bright white pop against the dark brown.
Just before serving, place a few small mint leaves (green) and a single sliced strawberry (red) on each square. This turns a simple sheet cake into a professional looking dessert.
Busted Myths About the Sheet Cake Process
One common myth is that you need to wait for the cake to cool before frosting it. In most baking, that is 100% true because buttercream will melt into an oily puddle. But with a texas sheet cake recipe, the heat is your friend. The cake is essentially a sponge, and when it is hot, the pores are open.
The warm glaze sinks into those pores, creating a moist barrier that keeps the cake fresh for much longer than a standard frosted cake.
Another misconception is that you can substitute baking powder for baking soda 1:1. They are not the same thing. Soda is much stronger and specifically needs the buttermilk to activate. If you switch them without adjusting the quantities and the acid, you will end up with a flat cake that has a weird, soapy aftertaste.
Stick to the soda here; it is the key to that specific, light yet-fudgy texture.
Finally,, some people think that sifting the flour isn't necessary for "rustic" sheet cakes. While you can get away without it, sifting the flour with the sugar and cocoa ensures that you don't have to over whisk the batter to get rid of lumps. Over whisking develops gluten, and too much gluten makes a cake tough.
A quick sift leads to a more "shatter on-the tongue" texture that feels much more expensive than it actually is.
Keeping Your Chocolate Masterpiece Fresh and Moist
Storage is where this cake really shines. Because of the high fat content and the way the glaze seals the surface, it stays moist at room temperature for up to 3 days. Just make sure to cover the pan tightly with plastic wrap or aluminum foil.
If you live in a particularly humid environment, you might want to move it to the fridge after the first day to prevent the glaze from getting too sticky.
If you have leftovers (which is rare!), this cake freezes beautifully. I like to cut it into individual squares and wrap them twice in plastic wrap, then put them in a freezer bag. They will stay fresh for up to 2 months. To eat, just let a square sit on the counter for about 20 minutes.
It actually tastes quite incredible when it is still slightly chilled, almost like a piece of chocolate fudge.
For a zero waste tip, if the edges of your cake ever get a little too dry, don't throw them away. Crumble the dry edges into a bowl and use them as a topping for vanilla ice cream, or mix them into a milkshake. The concentrated chocolate flavor of the "overbaked" bits is actually quite a treat when paired with something creamy. If you find yourself with extra buttermilk, it's the perfect excuse to whip up a batch of Homemade Orange Cake for a citrusy contrast later in the week.
The Best Complements for Rich Chocolate Flavors
While this cake is a star on its own, it loves company. A cold glass of whole milk is the traditional partner, but if you are serving this at a dinner party, a strong cup of black coffee is the way to go.
The bitterness of the coffee cuts through the intense sweetness of the powdered sugar glaze, refreshing your palate between bites.
If you want to go the "a la mode" route, a scoop of high-quality vanilla bean ice cream is the classic choice. The way the cold ice cream melts into the fudgy glaze is pure magic. For something a bit more sophisticated, try a dollop of unsweetened whipped cream with a tiny bit of orange zest folded in.
The citrus notes brighten up the heavy chocolate and make the whole dessert feel much lighter.
If you are planning a full menu, this cake is the heavy hitter at the end of the night. It pairs beautifully after a meal that has some spice or acidity. Think about serving it after a big spread that includes a Cream Cheese Corn Casserole, where the savory, creamy corn prepares the taste buds for the rich chocolate finish. The goal is always balance, and this texas sheet cake recipe provides the perfect, decadent punctuation mark to any gathering.
- If you want a deeper color, use dark cocoa powder.
- If you want it less sweet, add a tablespoon of instant espresso to the boiling water.
- If you want a crunchier top, toast the pecans in a dry pan for 3 minutes before adding them to the glaze.
Whether you are making this for a crowd or just because it is a Tuesday and you need a chocolate fix, remember that the secret is in the heat. Keep your water boiling, your cake hot, and your glaze ready to pour. You are going to love how easy it is to create something that looks and tastes this elegant. Happy baking!

Recipe FAQs
What is the difference between a standard sheet cake and a Texas sheet cake?
A Texas sheet cake is significantly thinner and glazed while hot. Unlike standard layer cakes that are tall and frosted once cool, this version uses a thin batter poured into a jelly roll pan and topped with a pourable icing that sets as it cools.
What makes Texas sheet cake so special?
The unique hot-glaze technique creates a fudgy, candy like topping. By pouring the warm glaze over the cake immediately after it leaves the 350°F oven, the frosting seeps into the top layer to create a moist, decadent texture that is distinct from traditional buttercream.
What kind of pan should I use for Texas sheet cake?
Use an 18x13-inch jelly roll pan or a 9x13-inch baking pan. The surface area of these pans is crucial to achieving the signature thin profile and ensuring the cake bakes evenly in exactly 20 minutes.
Why is Texas sheet cake so thin?
It is designed to be a thin, single layer dessert meant for feeding a crowd. The thin structure is intentional, allowing the warm glaze to penetrate the surface perfectly, resulting in a rich, dense crumb that is easy to serve in squares.
How to ensure the glaze doesn't turn out lumpy?
Sift the powdered sugar before whisking it into your warm butter and cocoa mixture. This simple step ensures a smooth, silky finish, much like how we prioritize texture consistency when preparing a classic creme brulee to avoid uneven components.
Is it true the batter needs to be mixed for a long time to get a smooth texture?
No, this is a common misconception. You should only whisk the ingredients until the batter is smooth; over mixing once the flour is added will develop too much gluten and result in a tough, chewy cake instead of a tender one.
How to tell when the cake is finished baking?
Insert a toothpick into the center of the cake. If it comes out clean, the cake is done; because the bake time is short at 20 minutes, keep a close watch toward the end to avoid drying it out.
Classic Texas Sheet Cake

Ingredients:
Instructions:
Nutrition Facts:
| Calories | 306 kcal |
|---|---|
| Protein | 2.8 g |
| Fat | 15.5 g |
| Carbs | 42.1 g |
| Fiber | 1.1 g |
| Sugar | 32.3 g |
| Sodium | 128 mg |
