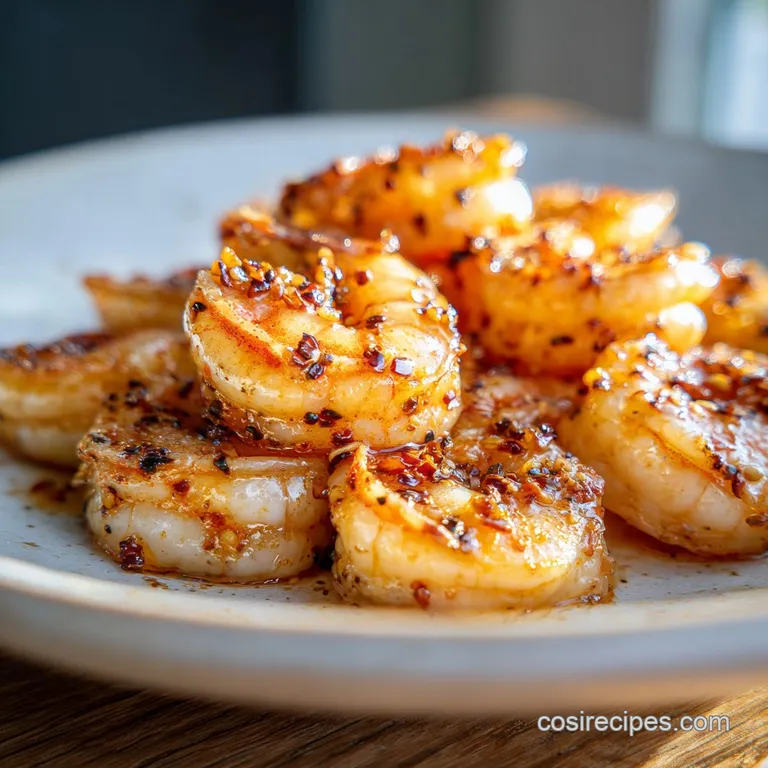
Hibachi Shrimp Recipe: Garlic Butter Glaze
- Time: Active 15 minutes, Passive 5 minutes, Total 20 minutes
- Flavor/Texture Hook: Snap crisp exterior with a velvety, garlic butter glaze
- Perfect for: A quick weeknight dinner that feels like a weekend celebration
- Mastering the Authentic Hibachi Shrimp Recipe
- The Physics of the Flash Sear
- Ingredient Deep Dive
- Essential Dish Specifications
- Recommended Kitchen Tools
- Cooking Step-by-Step
- Troubleshooting Pro Tips
- Flavor Profile Variations
- Scaling the Recipe
- Storage and Reheating
- Plating Style Guide
- Recipe FAQs
- 📝 Recipe Card
Mastering the Authentic Hibachi Shrimp Recipe
The smell of a Japanese steakhouse is something you never forget. It’s that intoxicating blend of toasted sesame oil, searing garlic, and the sharp, bright hiss of lemon juice hitting a scorching flat top.
I remember sitting at the communal table for my birthday years ago, watching the chef toss a shrimp tail into his hat. I realized then that the magic wasn't in the hat trick it was in the sequence of the ingredients hitting the heat.
For a long time, I tried to replicate this hibachi shrimp recipe at home but kept ending up with "boiled" looking shrimp or, worse, rubbery little knots that tasted like pure salt. I was missing the "decode" moment.
It turns out, the secret isn't a 500 degree professional griddle; it's about surface moisture and the specific chemistry of cold butter hitting a hot pan.
We're going to strip away the mystery and focus on what actually works in a standard kitchen. Forget the expensive equipment we're making a version that's actually better than the restaurant because we can control the quality of the fat and the snap of the protein.
Trust me, once you nail this timing, you'll never settle for soggy takeout again.
The Physics of the Flash Sear
Surface Desiccation: Excess water on the shrimp surface absorbs heat to evaporate, preventing the Maillard reaction. Drying the shrimp with paper towels ensures the heat goes toward browning the protein rather than steaming it.
Emulsion Stability: Adding cold, cubed butter at the end creates a temporary emulsion with the lemon juice and soy sauce. This results in a thick, velvety glaze that clings to the shrimp instead of a thin, oily puddle at the bottom of your pan.
Thermal Carryover: Shrimp continue to cook for about 60 seconds after leaving the pan. Pulling them off when they are just opaque prevents the proteins from tightening into a rubbery texture.
| Thickness | Internal Temp | Rest Time | Visual Cue |
|---|---|---|---|
| 1.5 cm (Small) | 63°C | 2 mins | Translucent center disappears |
| 2.5 cm (Jumbo) | 63°C | 3 mins | C shape curl with pink edges |
| 3.5 cm (Colossal) | 63°C | 4 mins | Firm to touch, opaque throughout |
The decision to use jumbo shrimp is more than just aesthetics; the larger surface area allows for a better sear to interior ratio. Smaller shrimp often overcook before you can even develop a proper crust, which is why I always recommend the 21-25 count for this specific method.
Ingredient Deep Dive
| Ingredient | Science Role | Pro Secret |
|---|---|---|
| Jumbo Shrimp | Main protein/Structure | Keep them chilled until the very second they hit the hot oil. |
| Unsalted Butter | Fat/Flavor Carrier | Use cold cubes to slow down the melting point for a creamier sauce. |
| Low Sodium Soy | Umami/Salt source | Low sodium prevents the dish from becoming an "over salted" mess. |
| Lemon Juice | Acid/Deglazer | It cuts through the butter fat and brightens the sesame notes. |
Choosing the right oil is just as vital as the shrimp itself. You need something with a high smoke point like avocado or grapeseed oil. Avoid extra virgin olive oil here; it will smoke and turn bitter before the pan is even hot enough to sear the shrimp properly.
Essential Dish Specifications
To get that restaurant style result on a budget, we have to be smart about our swaps. If jumbo shrimp are too pricey this week, you can use medium shrimp, but you'll need to cut your sear time by nearly half. The goal is the snap that "shatter" of the exterior against the tender middle.
| Original Ingredient | Substitute | Why It Works |
|---|---|---|
| Jumbo Shrimp (1.5 lbs) | Medium Shrimp (1.5 lbs) | Faster cook time. Note: Harder to get a deep sear without overcooking. |
| Avocado Oil (1 tbsp) | Vegetable Oil (1 tbsp) | High smoke point remains. Note: Lacks the slight buttery note of avocado oil. |
| Toasted Sesame Oil (1 tsp) | Plain Sesame Oil + Pinch Sugar | Provides the fat. Note: Lacks the deep nuttiness of the toasted version. |
While fresh shrimp is usually the gold standard, "fresh" at the grocery store counter is often just thawed frozen shrimp. Buying a high-quality frozen bag is actually a smart budget move and often results in a fresher tasting dish because they are flash frozen right on the boat.
| Feature | Fresh Shrimp | Shortcut (Frozen/Thawed) |
|---|---|---|
| Texture | Can be mushy if sitting | Consistent snap/firmness |
| Cost | $15-20 per lb | $9-12 per lb |
| Prep Time | High (Peeling/Cleaning) | Low (Often pre cleaned) |
Recommended Kitchen Tools
You don't need a massive teppanyaki table to make this work. A heavy bottomed stainless steel skillet or a well seasoned cast iron pan is actually superior for heat retention. The goal is a pan that doesn't drop in temperature the moment the cold shrimp touch the surface.
Chef's Tip: If you have a Blackstone or outdoor griddle, this recipe scales beautifully. Just make sure to create "heat zones" one screaming hot for the sear, and one medium low for finishing with the butter and garlic.
I personally love using a wide, flat carbon steel pan. It acts very similarly to a commercial hibachi grill. If you're using non stick, be careful; many non stick coatings aren't designed for the high heat required to get a proper sear on seafood.
Cooking step-by-step
1. The Pre Heat and Prep Phase
Pat the 1.5 lbs of jumbo shrimp completely dry with paper towels. Note: This is the most important step for a good sear. Toss them in a bowl with 0.5 tsp sea salt, 0.5 tsp cracked black pepper, and 0.25 tsp garlic powder until evenly coated.
2. The over High heat Sear
Set your skillet over medium high heat and add 1 tbsp neutral oil. Wait until the oil is shimmering and just starting to wisps of smoke. Place the shrimp in the pan in a single layer, making sure they aren't touching.
3. The First Flip
Cook the shrimp for 60 to 90 seconds without moving them. Note: Patience creates the crust. Flip each shrimp once they are golden brown and opaque halfway up the side.
4. The Aromatics
Immediately add 2 cloves of minced garlic to the center of the pan. Stir the garlic for just 30 seconds until it smells fragrant but hasn't turned brown.
5. The Deglaze
Pour in 1 tbsp low sodium soy sauce and 1 tsp toasted sesame oil. The liquid will bubble vigorously; this is lifting the flavor from the bottom of the pan.
6. The Butter Finish
Add the 3 tbsp of cold, cubed unsalted butter. Use a spoon or spatula to swirl the butter as it melts, coating every shrimp in the silky mixture.
7. The Brightening
Squeeze the juice from 0.5 fresh lemon over the pan. Cook for 30 more seconds while tossing until the sauce thickens slightly and clings to the shrimp.
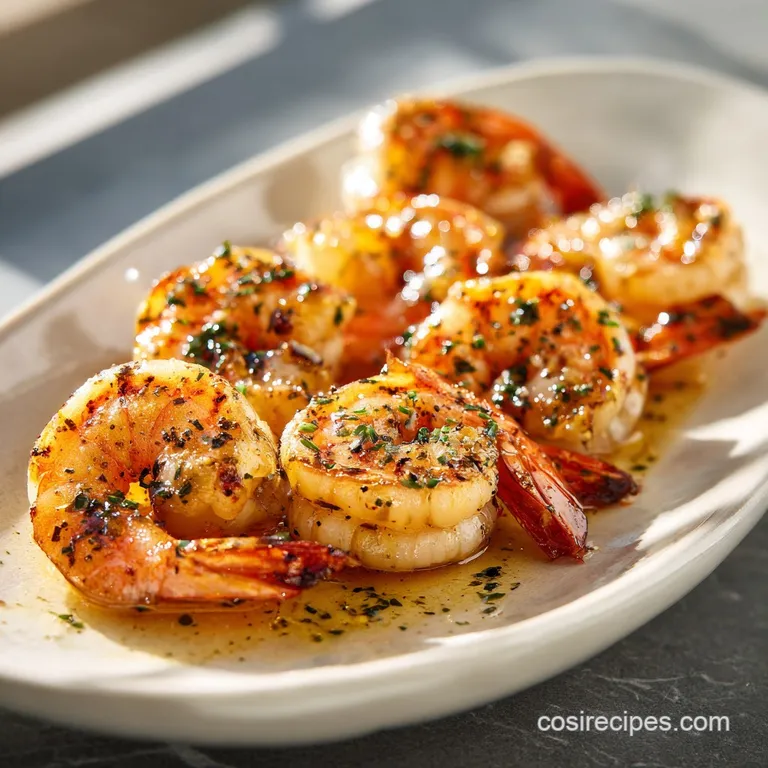
8. The Final Garnish
Remove from heat immediately. Sprinkle with 1 tbsp of finely chopped parsley or scallions. Serve while the sizzle is still audible.
Troubleshooting Pro Tips
Why Your Shrimp Is Rubbery
Usually, this is a result of overcooking or "crowding." When you put too many shrimp in the pan at once, the temperature drops, and the shrimp start to stew in their own juices instead of searing. This long, slow heat makes the protein fibers tighten into rubber.
The Garlic Burn Problem
Garlic has a high sugar content and a low burn point. If you add it at the very beginning with the oil, it will be bitter and black by the time the shrimp are done. Always add it during the last 90 seconds of cooking.
| Problem | Root Cause | Solution |
|---|---|---|
| Watery Sauce | Shrimp weren't dried | Pat shrimp with 3 layers of paper towels before seasoning. |
| No Brown Crust | Pan wasn't hot enough | Heat oil until it shimmers; test one shrimp first it should hiss. |
| Bitter Aftertaste | Garlic scorched | Add garlic only after the first flip of the shrimp. |
Common Mistakes Checklist:
- ✓ Did you pat the shrimp dry? (Wet shrimp will steam, not sear).
- ✓ Is the pan screaming hot? (You need that initial "hiss" for texture).
- ✓ Are you using cold butter? (Warm butter separates into oil too quickly).
- ✓ Did you remove the tails? (For home eating, removing tails makes for a better glaze coverage).
- ✓ Are you over stirring? (Let them sit for 60 seconds to develop the crust).
Flavor Profile Variations
If you want to turn this into a full meal, this hibachi shrimp recipe pairs beautifully with a side of Hibachi Fried Rice recipe. The savory soy from the rice complements the citrus butter glaze on the shrimp perfectly.
Hibachi Shrimp and Vegetable Recipe
To make this a one pan wonder, sear sliced zucchini and onions first in the oil, remove them, then cook the shrimp. Toss everything back together during the "Butter Finish" step. The vegetables soak up the extra garlic butter and lemon juice.
Spicy Sriracha Variation
For those who like a kick, whisk 1 tsp of Sriracha into the soy sauce before adding it to the pan. The heat balances the richness of the butter. I've found this is a great way to "decode" the spicy shrimp versions found in many modern fusion spots.
Scaling the Recipe
Scaling this dish requires a bit of strategy because of the pan space.
- Scaling Down (1-2 servings): Use a smaller 8 inch skillet. You can use a whole egg yolk in the rice if serving on the side, but for the shrimp, just halve the butter and soy.
- Scaling Up (6-8 servings): Do not try to cook 3 lbs of shrimp in one pan. Cook in two or three batches. Keep the first batch in a warm oven (60°C) while finishing the rest. Only add the lemon juice to the final combined batch to keep the "zing" fresh.
Storage and Reheating
Storage: Store leftovers in an airtight container in the fridge for up to 3 days. I don't recommend freezing cooked shrimp, as the texture becomes quite mealy upon thawing.
Reheating: Avoid the microwave! It turns shrimp into pencil erasers. Instead, heat a pan over medium heat with a tiny splash of water or a half teaspoon of butter. Toss the shrimp for 60 seconds just until warmed through.
Zero Waste Tip: Don't throw away those shrimp shells! Throw them into a freezer bag. When the bag is full, boil them with some onion scraps and celery to make a quick seafood stock for risotto or chowder. It’s free flavor that most people just toss in the bin.
Plating Style Guide
For that classic teppanyaki look, serve the shrimp over a bed of Homemade Hibachi Noodles recipe. Use a shallow bowl rather than a flat plate to catch all that glorious garlic butter sauce.
I like to pile the shrimp in the center and garnish heavily with toasted sesame seeds and fresh green scallions cut on a sharp bias. The green against the pink shrimp and golden butter looks incredibly professional.
Honestly, don't even bother with the "shrimp sauce" (yum yum sauce) if you've done the lemon butter finish correctly the shrimp should be flavorful enough to stand entirely on their own.
Right then, let's crack on and get that pan hot. You’re only 20 minutes away from the best shrimp you’ve had all year. Trust me on this the cold butter trick is a total shift in how you'll look at stovetop seafood forever!

Recipe FAQs
What seasoning is used in hibachi shrimp?
Simple salt, pepper, and garlic powder. The key is to keep the primary seasoning light so it doesn't compete with the finishing sauce.
What is hibachi shrimp sauce made of?
A simple pan sauce made from cold butter, soy sauce, and fresh lemon juice. This process creates an emulsion that clings to the shrimp, providing the signature savory tart finish.
Why is hibachi shrimp so good?
It's the high heat sear followed by a butter emulsion finish. The initial sear creates texture and flavor through the Maillard reaction, while the finishing sauce provides richness and acidity.
How do Chinese restaurants make shrimp so tender?
They control the cooking time and use a technique called 'velveting' or very rapid high heat searing. If you master the thermal carryover timing pulling the shrimp just before they look fully done you prevent the proteins from seizing up.
Can I use frozen shrimp for hibachi?
Yes, high-quality frozen shrimp is often better than fresh supermarket shrimp. Ensure you thaw them completely and pat them extremely dry before seasoning to achieve a good crust.
What oil is best for achieving the high heat sear?
Avocado or grapeseed oil are recommended for their high smoke points. You need an oil that can withstand intense heat without breaking down and creating a bitter flavor profile.
What should I serve with hibachi shrimp?
Fried rice or stir fried vegetables complement the sauce perfectly. If you enjoyed mastering the quick butter finish on the shrimp, you will find similar success learning flavor balancing when preparing our Mustard Dipping Sauce recipe.
Hibachi Shrimp Recipe At Home
Ingredients:
Instructions:
Nutrition Facts:
| Calories | 290 kcal |
|---|---|
| Protein | 36.1 g |
| Fat | 13.6 g |
| Carbs | 1.2 g |
| Fiber | 0.1 g |
| Sugar | 0.3 g |
| Sodium | 748 mg |
